
Stuck with the same Canva fonts everyone else uses? In just 3 steps, you can upload your own custom font, use Google Fonts, and make your designs pop without touching Photoshop.
Custom fonts can transform your designs from generic to extraordinary, helping your business stand out in a crowded digital landscape. Whether you’re creating social media posts, presentations, or marketing materials, the right typography makes all the difference..
TL;DR
In this comprehensive guide, you’ll discover:
- Quick 3-step process to upload fonts
- Step-by-step process to upload fonts to Canva
- Canva Pro vs Free limitations explained
- Google Fonts integration methods
- Troubleshooting common upload issues
- Best practices for brand consistency.
Quick Steps to Add Fonts in Canva
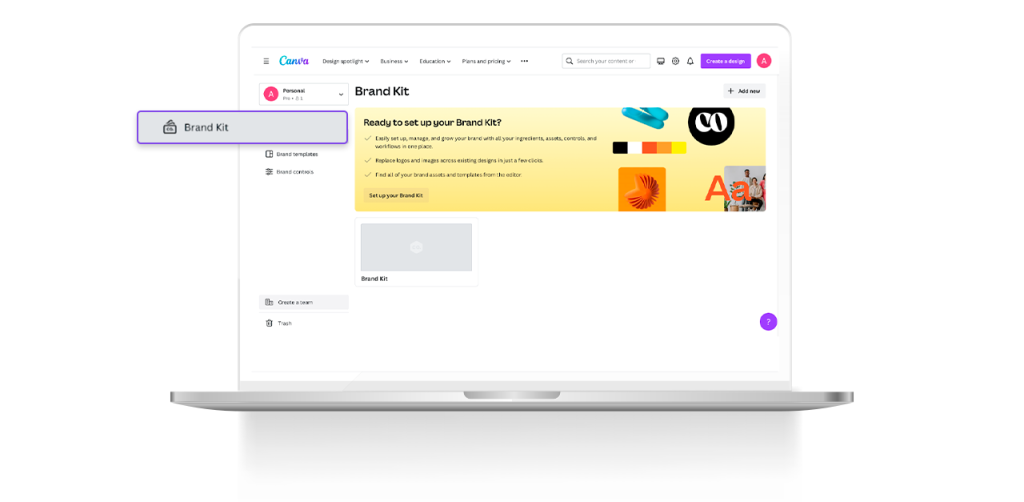
- Go to Brand Kit (Pro account required).
- Click Upload Font and choose a
TTF,OTF, orWOFFfile. - Apply your font in any design.
Understanding Canva and its Font Library
Canva’s font library is a great starting point, but it’s not always enough for brand-level design. You can search for specific fonts using the search bar and choose from supported formats like WOFF, TTF, and OTF. But if you can’t find one that matches your brand identity exactly, it’s time to upload your own.
Pro Tip: If you use Canva often, organize your fonts in a “Brand Kit” so you can apply them in a single click.
Also Read: How to Make Background Transparent in Canva?
Why Custom Fonts are Essential for Your Design

The use of custom fonts in your design can significantly impact the overall aesthetics and effectiveness of your projects for several reasons. Here’s why adding fonts to Canva could be beneficial:
Why Custom Fonts are Essential for Your Design
Custom fonts can:
- Give your brand a distinct typographic identity
- Convey emotions and messages tailored to your values
- Offer full creative freedom and experimentation
- Maintain consistent style and readability
- Reduce licensing issues
- Create a memorable user experience that boosts brand recall
How to Add Fonts to Canva?
Adding custom fonts to Canva is pretty straightforward, let’s get started
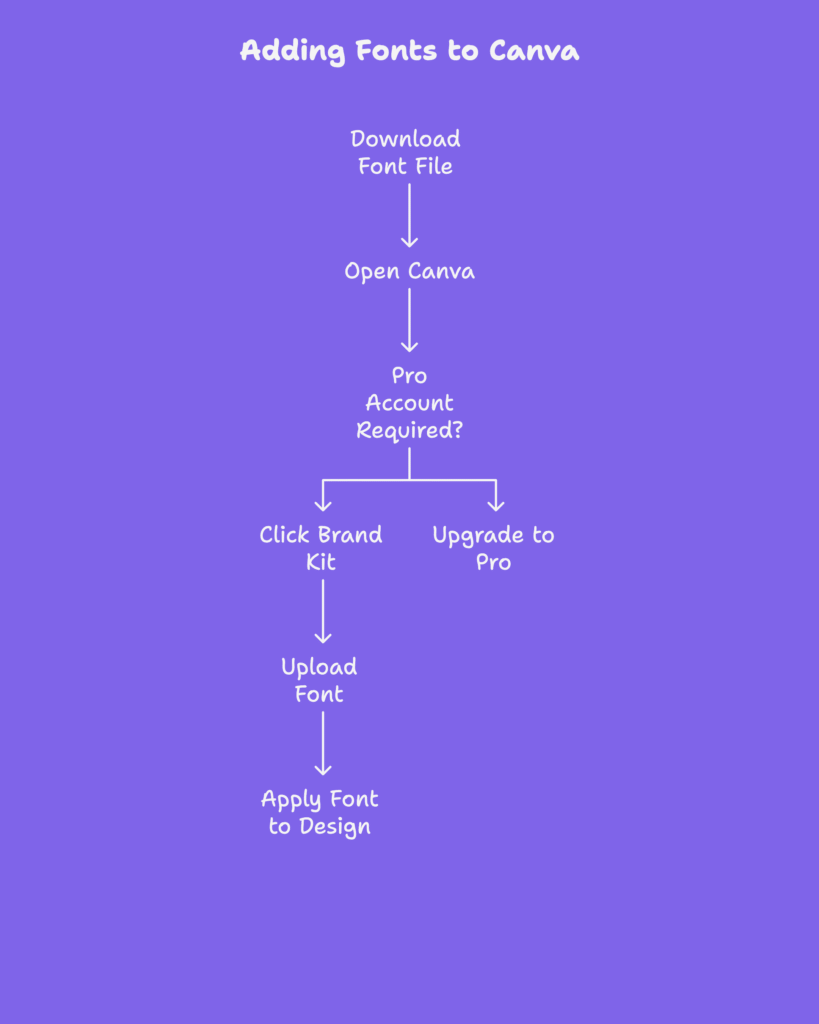
Step 1: Start by downloading the desired font file from a reputable source. If you already don’t have a font file with you.

Step 2: From the left panel, click “Brand” and access the Brand Kit feature. Remember, you need a Canva Pro subscription to use the brand kit feature.
Step 3: Upload the downloaded font file (or your own font) to your Canva Brand Kit. It allows you to upload different fonts for different sections as shown below. Once done, you can enjoy uniformity in your design with ease.

Do you think this is too much work finding and uploading all the fonts, logo variations, color palettes, etc.? If yes, then you should let the experts handle it for you.
At Design Shifu, we provide you with Canva-compatible, editable files so you can always make changes to the Canva board.
You can get customized templates, social media posts, and newsletter templates designed by us and make changes to the same files on Canva with ease. Check out our unlimited graphic design plans to get started.
How to Install a Font in Canva
Sometimes the font you want isn’t available in Canva’s built-in library. Don’t worry, you can easily add your own fonts by downloading them first and then uploading them to Canva. Here’s how you can do it
Downloading the Desired Font
- Visit a trusted font website such as Google Fonts, Creative Market, Envato Elements, or Behance.
- Search for the font you want and download it in a compatible format like TTF or WOFF (both are supported by Canva).
- Save the font file to your computer or mobile device.
- If the font is downloaded as a ZIP file, unzip it before proceeding.
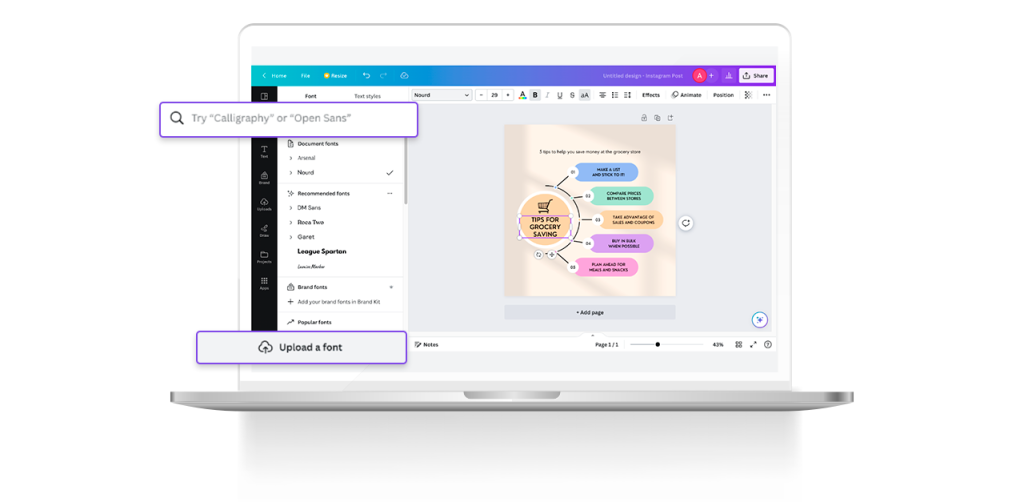
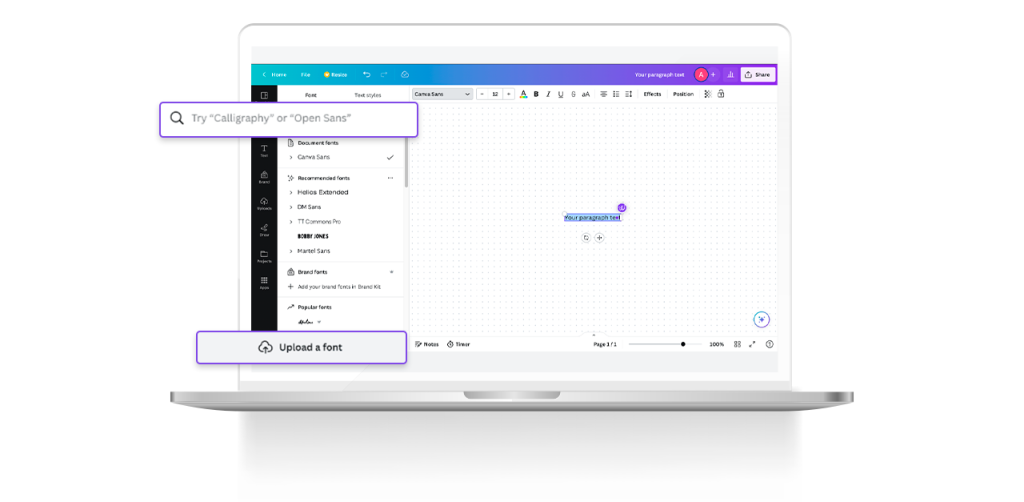
Uploading Fonts to Canva
- Open Canva and go to your Brand Kit (available in Canva Pro).
- Scroll to the Brand Fonts section and click Upload a font.
- Select the font file you just downloaded.
- Once uploaded, the font will appear in your Canva font list, ready to use in your designs.
Pro Tip: Always check the font’s licensing terms before using it in commercial projects.
Use these steps to use the brand kit in your designs while you are designing:

Access brand logos by navigating to the ‘Logos’ section in the left panel. In case the ‘Logos’ section is not visible, click on the three dots labeled ‘More’ and locate the ‘Logos’ folder within the extended options.
When attempting to insert a header or subheader from the ‘Text’ section, the font styles will automatically align with your chosen preferences.
If you wish to modify the background, elements, or text colors, you’ll find the brand color palette(s) within the color swatch options.
Effortlessly switch between various brands by utilizing the brand name dropdown. These dropdowns are accessible wherever your brand elements are located, such as the logos folder, color palettes, font styles, and more.
Troubleshooting Common Issues in Font Upload
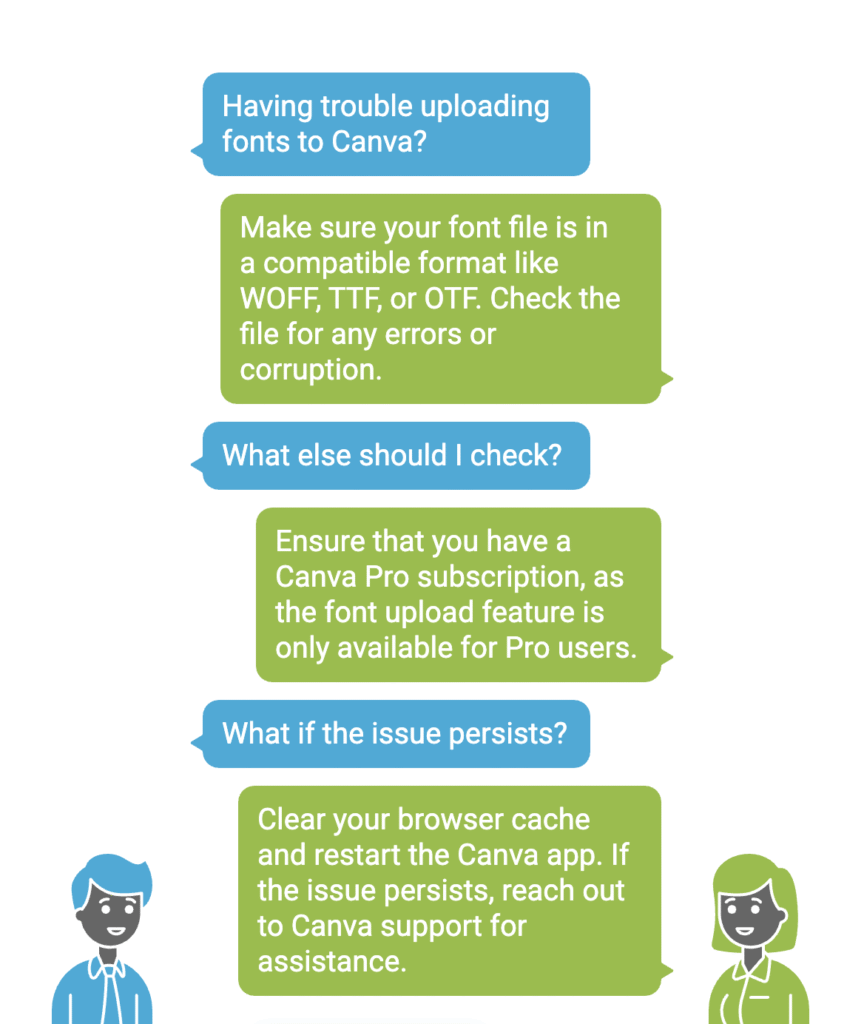
Does Canva Support All Font File Types?
Canva supports popular font file types like WOFF, TTF, and OTF, including the WOFF format. Before uploading, make sure the font file is compatible with Canva. Canva does not support less common or proprietary font file types. Also, ensure that the font file size is within Canva’s limits. If you encounter any issues, consider converting the font file to a supported format.
Is Canva Pro Necessary to Add Custom Fonts?
While Canva Pro provides access to a wide range of fonts, the free version of Canva does not allow you to import custom fonts. However, Canva’s free version still offers a selection of fonts to choose from. If you’re not currently a Canva Pro user, you can click here for a free trial of the Pro version. Trust me, it’s worth it! Canva Pro offers the additional benefit of uploading and using your own brand fonts through the brand kit feature.
How to add Google Fonts to Canva?
Adding Google Fonts to Canva is a simple process.
Step 1: First, visit the Google Fonts website and select the fonts you want to use.
Then step 2: Once you have chosen your desired fonts, click on the “Download” button to download them to your computer.
Step 3: Next, open Canva and go to the design you are creating.
Finally Step 4: Now, we will change the font being used. Click the font that is currently from the top and then see at the bottom.
Step 5: Click upload font and select the file you wish to upload and you will be good to go.
Step 6: Access the newly uploaded font from here only and use it in your design.
Key Takeaways: Uploading Fonts to Canva
- Custom fonts elevate your brand identity and make designs stand out from Canva’s default options.
- Canva Pro is required to upload custom fonts via the Brand Kit feature.
- Supported file formats include TTF, OTF, and WOFF—convert your font if it’s in another format.
- Google Fonts can be integrated into Canva by downloading and uploading them to the Brand Kit.
- Organizing fonts, colors, and logos in the Brand Kit ensures design consistency across all projects.
- Common upload issues can be fixed by checking file compatibility, unzipping font files, clearing cache, or contacting Canva support.
- Adding step-by-step visuals/screenshots can significantly improve user engagement and comprehension.
- Outsourcing design to services like Design Shifu can save time by delivering Canva-ready templates with your brand fonts preloaded.
Conclusion
It is the font that makes or breaks your design. That’s the reason, why using custom fonts is critical for any brand. Custom fonts make you stand out while you keep your brand consistency intact.
Brands use unique designs to get more eyeballs and custom fonts are the biggest contributor here.
By downloading the desired font, accessing Canva’s Brand Kit, and uploading the font to your Brand Kit, you can seamlessly incorporate your favorite fonts into your designs. In case you start feeling overwhelmed with the whole Canva brand kit process, Design Shifu is here to help.
You can edit files designed by us anytime and anywhere with our seamless Canva integration. That’s like the unlimited reusability of a single template. So what are you waiting for? Book a call here to get started.
Frequently Asked Questions
Why can’t I upload a font to Canva?
To upload a font to Canva, ensure it’s in a supported file format like .ttf or .otf. Check if the font is already available in Canva’s library. Remember, copyrighted or licensed fonts may require permission. If you’re having trouble, try reopening your browser or logging out and back in.
Where do you find your favorite fonts to upload to Canva?
There are various websites where you can discover and download your favorite fonts, including free fonts, to use in Canva. Popular font resources like DaFont, Google Fonts, and Font Squirrel offer a wide selection of free fonts to choose from. After downloading the font, simply upload it to Canva by clicking on the “Upload a font” button.
What font file types are supported in canva?
Canva supports various font file types, including TrueType (.ttf), OpenType (.otf), and Web Open Font Format (.woff). You can choose from the built-in library or upload your own fonts by clicking on “Upload a font” in the Text tab. Just make sure you have the appropriate licensing rights for any fonts you upload or use in Canva.
How to add custom fonts to canva mobile app?
To upload a custom font on Canva mobile, go to Brand Kit on the sidebar, scroll to Fonts, and tap Add a font to upload from your device. While editing text, tap the font dropdown, scroll down, and tap Upload a font to directly upload it. The font will be available in your designs after it is uploaded!