
Your product might be amazing, but if the packaging looks bad, people won’t buy it. Think about it. When you walk into a store, which products catch your eye? The ones with boring, plain packaging or the ones that pop off the shelf? Print-ready packaging design ensures your product not only looks professional on the shelf but is also fully prepared for production without costly printing errors or delays.
Good packaging design isn’t just about making things pretty. It’s about telling your brand’s story, protecting your product, and making customers want to pick it up.
This guide will show you exactly how to create packaging designs that are ready to print and sell.
TL;DR
- Creating print-ready packaging design involves 10 key steps:
- Research your product and customers,
- Choose the right packaging type,
- Get accurate measurements,
- Set up files correctly (CMYK, 300 DPI, 3mm bleed),
- Design with clear fonts and colors, and create die lines,
- Check everything twice,
- Prepare print-ready PDFs, order a proof, and choose quality materials.
- Always use CMYK color mode, add bleed, and get a physical proof before mass production.
Why Print-Ready Packaging Design Matters
Print-ready means your design is perfect for the printer. No mistakes, no delays, and no wasted money.
When your design isn’t print-ready, here’s what happens:
- The printer sends it back for fixes
- You waste time going back and forth
- Your launch date gets pushed back
- Colors look different than you expected
- Text gets cut off at the edges
Getting it right the first time saves you headaches and money.
Step 1: Know Your Product and Customer
Before you design anything, answer these questions:
About your product:
- What size is it?
- Is it heavy or light?
- Does it break easily?
- Does it need to stay fresh or protected?
Know About your customer:
- Who will buy this product?
- Where will they see it (store shelf, online, gift shop)?
- What matters to them (price, quality, eco-friendly)?
- What age group are they?
About your competition:
- What do similar products look like?
- What colors do they use?
- How can you stand out?
When you understand these things, you’ll make smarter design choices.
Step 2: Choose Your Packaging Type
Different products need different packaging. Here are the most common types:
- Boxes: Great for cosmetics, electronics, food items, and gifts. They protect well and give you lots of space for design.
- Pouches and bags: Perfect for snacks, coffee, tea, or small items. They’re lightweight and use less material.
- Bottles and jars: Best for liquids, creams, and sauces. The label becomes your main design space.
- Tubes: Good for creams, gels, and paste products. The design wraps around the tube.
- Cans: Used for drinks, food, and some cosmetics. The entire surface is your canvas.
Pick the type that protects your product and fits your budget.
Step 3: Get the Right Measurements
This is super important. If you get the size wrong, nothing else matters.
You need three main measurements:
- Product dimensions: Measure your actual product. Add a little extra space so it fits comfortably inside.
- Packaging dimensions: This is the size of your box, pouch, or label after it’s made.
- Design dimensions: This is bigger than your packaging dimensions because you need bleed area.
What is bleed?
Bleed is extra space around your design (usually 3mm or 1/8 inch). Printers need this because cutting machines aren’t perfect. The bleed makes sure nothing important gets cut off.
Your print-ready packaging design file should be: Final size + bleed on all sides.
For example, if your box is 10cm x 10cm, your design file should be 10.6cm x 10.6cm (adding 3mm on each side).
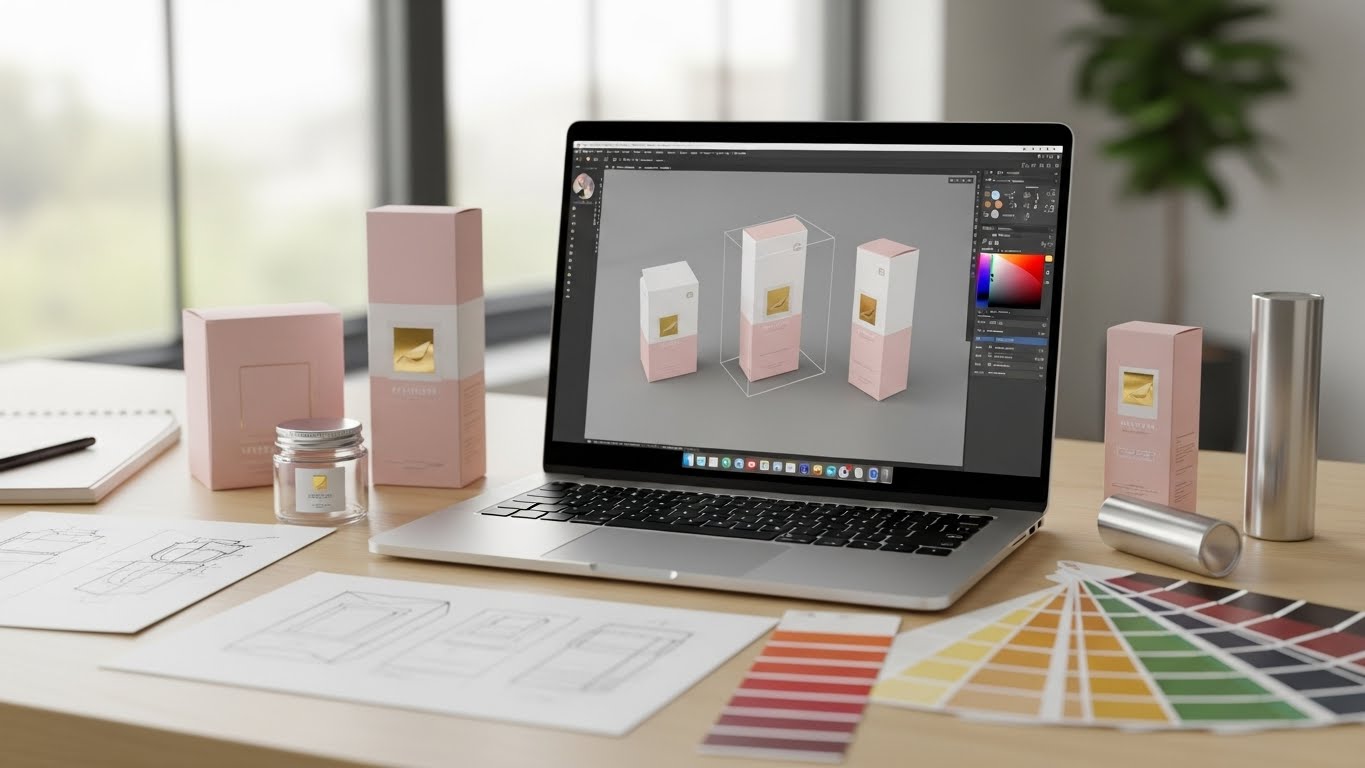
Step 4: Set Up Your File Correctly
Use design software like Adobe Illustrator, Photoshop, or free tools like Canva or GIMP.
File setup checklist:
- Color mode: Use CMYK, not RGB. RGB is for screens. CMYK is for printing. This makes sure your colors look right when printed.
- Resolution: Set it to 300 DPI minimum. This keeps everything sharp and clear.
- File format: Save as PDF, AI, or EPS. These formats keep quality high.
- Bleed: Add 3mm bleed on all sides of your design.
- Safe zone: Keep important text and logos at least 5mm inside from the edge. This prevents them from being cut off.
Get these settings right from the start. Changing them later can mess up your design.
Step 5: Design Your Packaging
Now comes the fun part. Here’s how to create a design that sells:
Color Choices in Print-Ready Packaging Design
Colors create feelings. Choose colors that match your brand and product.
- Red: Energy, excitement, urgency
- Blue: Trust, calm, professional
- Green: Natural, healthy, eco-friendly
- Yellow: Happy, optimistic, attention-grabbing
- Black: Luxury, sophisticated, modern
- White: Clean, simple, pure
Don’t use too many colors. Pick 2-3 main colors and stick with them.
Typography Guidelines for Print-Ready Packaging Design
Your text needs to be easy to read from a distance.
- Use simple, clear fonts for product names and important info
- Make text big enough (at least 8pt for small text, 14pt+ for main text)
- Don’t use more than 2-3 different fonts
- Make sure there’s good contrast between text and background
Add your logo properly
Your logo should be:
- Clear and sharp (use vector format if possible)
- Placed where people will see it first
- Big enough to recognize but not overwhelming
Include required information
Don’t forget the legal stuff:
- Product name
- Net weight or volume
- Ingredients list
- FDA Packaging Labeling Requirements
- Manufacturing date and expiry date
- Company name and address
- Barcode Registration
- Safety warnings or usage instructions
- Recycling symbols
Check the rules for your country. Different places have different requirements.
Use high-quality images
If you’re adding photos or illustrations:
- Use high resolution (300 DPI minimum)
- Make sure images are sharp, not blurry
- Use real product photos when possible
- Keep the style consistent
Blurry images make your product look cheap.
Keep it simple
Please don’t overload your packaging. White space is good. It makes your print-ready packaging design easier to read and more professional.
Focus on the most important information:
- What is it?
- Why should I buy it?
- Who makes it?
Step 6: Create Die Lines
Die lines are the cutting guides that show where the packaging will be cut, folded, or glued.
Think of them like a template. The printer uses them to cut your packaging to the exact right shape.
What you need:
- Cut lines: Where the packaging gets cut
- Fold lines: Where it gets folded (usually dashed lines)
- Safety zones: Where to avoid placing important content
- Glue areas: Where glue will be applied
Put die lines on a separate layer in your design file. Lock that layer so you don’t accidentally move or delete them.
Many printers provide die line templates. Ask for one before you start designing your print-ready packaging design
Step 7: Check Everything Twice
Before sending your design to the printer, check these things:
Color check
- Are you using CMYK, not RGB?
- Do your brand colors look right?
- Is there enough contrast?
Text check
- Is all text spelled correctly?
- Is important information included?
- Is text inside the safe zone?
- Can you read it easily?
Image check
- Are all images high resolution (300 DPI)?
- Are they sharp and clear?
- Are they the right size?
Technical check
- Is bleed added (3mm on all sides)?
- Are die lines on a separate layer?
- Is your file the right size?
- Are fonts outlined or embedded?
- Is the file format correct (PDF, AI, or EPS)?
Barcode check
- Is the barcode the right size?
- Is it in a flat area (not on a fold or curve)?
- Can it be scanned easily?
Print a test copy at actual size. Look at it carefully. Show it to other people. Ask if they can read everything clearly.
Step 8: Prepare Files for Printing
Your printer might have specific requirements. Always ask them first.
How to prepare your files:
- Outline your fonts: This converts text into shapes. It prevents font problems if the printer doesn’t have your fonts installed.
- Embed images: Make sure all images are part of the file, not linked from outside.
- Convert colors to CMYK: Double-check this. RGB colors can look very different when printed.
- Flatten layers: Combine all your design layers (but keep die lines separate).
- Add crop marks: These show the printer where to cut. Most PDF settings can add these automatically.
- Include color bars: These help printers match colors correctly during printing.
Save everything as a print-ready PDF. This is usually the safest format.
Step 9: Proofing and Testing Print-Ready Packaging Designs
Never skip the proof. A proof is a test print before doing the full production run.
Types of proofs:
- Digital proof: A printed sample on regular paper. It’s cheap and shows how colors will look.
- Physical proof: An actual sample of your packaging. It costs more but shows exactly what you’ll get.
Get a physical proof if you can afford it. Test the packaging:
- Does your product fit inside?
- Do the folds work correctly?
- Are colors accurate?
- Is everything readable?
- Does it feel right in your hand?
If something’s wrong, fix it now. Making changes after printing thousands of units is expensive.
Step 10: Choose the Right Materials
The material affects how your design looks and feels. Choose the materials which are widely recyclable.
Common packaging materials:
- Cardboard: Strong, recyclable, and affordable. Works for boxes and cartons.
- Kraft paper: Brown, natural look. Popular for eco-friendly brands.
- Glossy paper: Shiny finish that makes colors pop. Good for premium products.
- Matte paper: Smooth, non-shiny finish. Looks sophisticated and modern.
- Plastic: Durable and waterproof. Less eco-friendly but protects well.
Think about:
- How will the material feel in someone’s hands?
- Does it match your brand (luxury, eco-friendly, fun)?
- Will it protect your product during shipping?
- Is it recyclable or biodegradable?
Common Print-Ready Packaging Design Mistakes to Avoid
- Using RGB instead of CMYK: Your colors will look wrong when printed.
- Forgetting the bleed: Important parts of your design might get cut off.
- Low resolution images: Blurry, pixelated prints look unprofessional.
- Text too close to edges: It might get cut off during trimming.
- Not checking with the printer first: They might have specific requirements you didn’t know about.
- Skipping the proof: You’ll waste money if you print thousands of bad designs.
- Too much information: Cramped packaging is hard to read and looks messy.
- Ignoring legal requirements: You could get fined or have to reprint everything.
Tools for Creating Print-Ready Packaging Designs
Professional tools:
- Adobe Illustrator (best for packaging design)
- Adobe Photoshop (good for image editing)
- Adobe InDesign (good for text-heavy designs)
Free tools:
- Canva (easy for beginners)
- GIMP (free Photoshop alternative)
- Inkscape (free Illustrator alternative)
Online mockup generators:
- Packhelp
- Smartmockups
- Placeit
These mockup tools help you visualize how your print-ready packaging design will appear on real packaging before production.
If you’re new to graphic design tools or here is the step-by-step breakdown of how to create professional graphic designs
Final Tips
- Think about the whole experience: Your packaging is the first thing customers touch. Make it memorable.
- Test it in real conditions: Put it on a shelf with competitors. Does it stand out?
- Keep your brand consistent: Use the same colors, fonts, and style across all your products.
- Consider sustainability: More customers care about eco-friendly packaging. Use recyclable materials when possible.
- Get feedback: Show your design to people who match your target customer. Listen to their honest opinions.
- Build relationships with printers: Good printers will help you avoid mistakes and suggest improvements.
- Keep source files organized: You’ll need them for reprints and new products.
Ready to Print
Creating print-ready packaging designs takes time and attention to detail. But when you do it right, your product will stand out, protect what’s inside, and make customers excited to buy.
Follow these steps, double-check everything, and don’t skip the proof. Your packaging is an investment in your brand.
Now go create something amazing.
FAQs
What does print-ready mean?
Print-ready means your design file is completely prepared for the printer with no errors. It has the correct color mode (CMYK), proper resolution (300 DPI), bleed areas, embedded fonts, and all technical requirements met. When a file is print-ready, the printer can start production immediately without asking for changes.
What’s the difference between CMYK and RGB?
How much bleed should I add to my packaging design?
What is a die line and why do I need it?
What file format should I use for printing?
How do I make sure my colors print correctly?
What resolution should my images be?
How do I know if my packaging design is too crowded?